

Enjoy a delicious homemade Chicken Katsu served with perfectly seasoned rice and a tangy sauce. This crispy, golden-brown dish is a Japanese favorite that’s sure to impress! Japanese Katsu Bowls: A Delicious Guide to Making Authentic Katsu at Home makes this delectable meal accessible for any occasion, whether it’s a cozy family dinner or a special gathering with friends.
Why You’ll Love This Recipe
- Easy to Make: With simple ingredients and clear steps, you can whip up an authentic katsu bowl in no time.
- Delicious Flavor: The combination of crispy chicken, seasoned rice, and savory sauces creates an explosion of flavors.
- Versatile Dish: Feel free to substitute chicken with pork or even tofu for a vegetarian option, making it suitable for everyone.
- Perfect for Meal Prep: These bowls store well and can be reheated easily, making them ideal for busy weeknights.
- Impressive Presentation: Serve it beautifully garnished with cabbage and green onions for a dish that looks as good as it tastes.
Tools and Preparation
Preparing your Japanese Katsu Bowls requires some essential tools that will help you achieve the best results. Having the right equipment also makes the cooking process smoother.
Essential Tools and Equipment
- Skillet
- Saucepan
- Mixing bowls
- Meat mallet
- Tongs
Importance of Each Tool
- Skillet: Ideal for frying the chicken until it reaches that perfect golden brown color.
- Saucepan: Necessary for cooking the rice evenly without burning it.
- Mixing bowls: Useful for preparing breading and sauces without making a mess.
- Meat mallet: Ensures even thickness in chicken breasts for consistent cooking.
Ingredients
For the Chicken Katsu
- 2 boneless chicken breasts (or pork loin, if preferred)
- Salt and pepper, to taste
- 1 cup all-purpose flour
- 2 large eggs
- 1 cup panko breadcrumbs
- Vegetable oil, for frying
For the Rice
- 2 cups Japanese short-grain rice
- 2 ½ cups water
- 1 tablespoon rice vinegar
- 1 tablespoon sugar
- ½ teaspoon salt
For the Sauce and Garnish
- ¼ cup tonkatsu sauce (or store-bought if you prefer)
- 1 tablespoon soy sauce
- 1 teaspoon Worcestershire sauce
- 1 teaspoon ketchup
- 1 cup shredded cabbage
- 2 green onions, sliced
- Sesame seeds, for garnish
- Pickled ginger (optional)
How to Make Japanese Katsu Bowls: A Delicious Guide to Making Authentic Katsu at Home
Step 1: Rinse the Rice
Rinse the rice under cold water until the water runs clear. This removes excess starch and helps prevent stickiness.
Step 2: Soak the Rice
Transfer the rinsed rice to a saucepan. Add water and soak for 30 minutes.
Step 3: Cook the Rice
Cover the saucepan and bring it to a boil. Reduce heat to low and simmer for 15 minutes without lifting the lid.
Step 4: Let It Rest
Turn off the heat but keep the lid on. Let the rice sit covered for another 10 minutes.
Step 5: Season the Rice
In a bowl, mix rice vinegar, sugar, and salt until dissolved. Fold this mixture into your cooked rice gently.
Step 6: Prepare Chicken
Pound chicken breasts to an even thickness of about ½ inch. Season with salt and pepper.
Step 7: Set Up Breading Station
Create a breading station with flour in one dish, beaten eggs in another, and panko breadcrumbs in a third.
Step 8: Bread the Chicken
Dredge each piece of chicken in flour first, then dip into beaten eggs before coating thoroughly with panko breadcrumbs.
Step 9: Fry Chicken
Heat vegetable oil in your skillet over medium heat. Fry each piece of chicken for about 4–5 minutes on each side until golden brown and fully cooked.
Step 10: Drain Chicken
Once cooked, drain on paper towels. Allow resting before slicing into strips.
Step 11: Make Sauce
Combine tonkatsu sauce, soy sauce, Worcestershire sauce, and ketchup in a bowl. Mix well to create your flavorful drizzle.
Step 12: Assemble Your Bowl
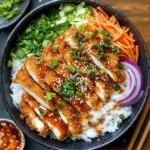
Serve seasoned rice on plates. Top with sliced katsu, shredded cabbage, green onions, sesame seeds, and drizzle with your prepared sauce. Add pickled ginger if desired.
With these steps complete, you’ll have created mouthwatering Japanese Katsu Bowls, perfect for impressing family or guests! Enjoy!
How to Serve Japanese Katsu Bowls: A Delicious Guide to Making Authentic Katsu at Home
Serving Japanese Katsu Bowls is all about presentation and pairing the right elements to enhance the flavors. Here’s how to create a delightful meal that impresses both the eyes and taste buds.
Create a Balanced Plate
- Rice as a Base: Start with a generous serving of seasoned rice as the foundation of your bowl. The fluffy rice complements the crispy katsu perfectly.
- Layered Katsu: Slice the katsu into strips and arrange them on top of the rice for an attractive display. This makes it easy for diners to enjoy each bite.
- Fresh Vegetables: Add shredded cabbage for a crunchy texture. It balances the rich flavors of the katsu and adds freshness to the dish.
- Garnish with Green Onions: Sprinkle sliced green onions on top for added color and flavor. They provide a subtle oniony kick that pairs well with katsu.
- Drizzle Sauce Generously: Pour tonkatsu sauce over the katsu and rice before serving. This adds a tangy sweetness that elevates every bite.
- Optional Pickled Ginger: Include pickled ginger on the side for those who like an extra zing. It cleanses the palate between bites.

How to Perfect Japanese Katsu Bowls: A Delicious Guide to Making Authentic Katsu at Home
Perfecting your Japanese Katsu Bowls involves mastering some key techniques. Here are essential tips to ensure your dish is authentic and delicious.
- Use Panko Breadcrumbs: Choose high-quality panko breadcrumbs for that signature crunch. They create a lighter, crispier coating than regular breadcrumbs.
- Control Oil Temperature: Ensure your oil is hot enough before frying. A temperature of 350°F (175°C) will help achieve golden, crispy katsu without excess grease.
- Rest After Frying: Let cooked katsu sit on paper towels before slicing. This helps maintain its crunch by allowing excess oil to drain away.
- Adjust Rice Seasoning: Taste your seasoned rice and adjust vinegar, sugar, or salt according to your preference. Perfectly seasoned rice enhances overall flavor.
Best Side Dishes for Japanese Katsu Bowls: A Delicious Guide to Making Authentic Katsu at Home
Pairing side dishes with your Japanese Katsu Bowl can elevate your meal experience. Here are some great options that complement this delicious dish.
- Miso Soup: A classic Japanese soup made from miso paste, tofu, and seaweed provides warmth and umami flavor.
- Edamame: Steamed edamame pods sprinkled with sea salt offer a healthy, protein-packed snack that’s easy to prepare.
- Japanese Pickles (Tsukemono): These fermented vegetables add tanginess and crunch, balancing out the richness of katsu.
- Nasu Dengaku (Miso-Glazed Eggplant): Grilled eggplant topped with sweet miso glaze adds depth and sweetness alongside katsu.
- Seaweed Salad: A refreshing salad made from various seaweeds, providing a light contrast to heavier dishes like katsu.
- Cucumber Sunomono: A vinegar-based cucumber salad that’s crisp and refreshing; it cuts through the richness of fried foods nicely.
- Tempura Vegetables: Lightly battered and fried vegetables add another layer of crunch while being deliciously satisfying.
- Rice Balls (Onigiri): These portable snacks can be filled with various ingredients like tuna or pickled plum, making them a delightful addition to any meal.
Enjoy creating your own Japanese Katsu Bowl experience!
Common Mistakes to Avoid
Making Japanese Katsu Bowls at home can be delightful, but there are common mistakes that can affect your results.
- Not using panko breadcrumbs: Regular breadcrumbs won’t give the same crunch. Always opt for panko for that authentic texture.
- Skipping the soaking step for rice: Not soaking the rice means it may become gummy. Soak it for at least 30 minutes for perfect grains.
- Overcrowding the pan when frying: Frying too many pieces at once leads to uneven cooking. Fry in batches to maintain the right oil temperature.
- Using cold chicken: Cooking cold chicken can result in uneven frying and longer cooking times. Let your chicken sit at room temperature before breading.
- Not letting the katsu rest before slicing: Slicing right after cooking can cause juices to run out. Allow it to rest for a few minutes to keep it juicy.
Refrigerator Storage
- Store leftover katsu and rice in airtight containers. They will stay fresh for up to 3 days.
- Keep the sauce separate to prevent sogginess.
Freezing Japanese Katsu Bowls: A Delicious Guide to Making Authentic Katsu at Home
- Freeze cooked katsu and rice in individual portions for up to 2 months.
- Wrap katsu tightly in plastic wrap or use a freezer bag to avoid freezer burn.
Reheating Japanese Katsu Bowls: A Delicious Guide to Making Authentic Katsu at Home
- Oven: Preheat your oven to 350°F (175°C) and place katsu on a baking sheet. Heat for about 10-15 minutes until warm and crispy.
- Microwave: Place katsu on a microwave-safe plate, covered with a damp paper towel, and heat in 30-second intervals until heated through.
- Stovetop: Reheat katsu in a skillet over medium heat with a little oil. This will help regain some crispiness.
Frequently Asked Questions
What are Japanese Katsu Bowls?
Japanese Katsu Bowls are a delicious dish featuring breaded and fried meat, typically served over seasoned rice with vegetables and sauce.
How do I make authentic Tonkatsu sauce?
To make authentic Tonkatsu sauce, combine soy sauce, Worcestershire sauce, ketchup, sugar, and rice vinegar. Adjust ingredients based on your taste preference.
Can I use pork instead of chicken for katsu?
Yes! You can use pork loin as an alternative. Just follow the same breading and frying instructions.
How do I customize my Japanese Katsu Bowls?
You can customize your bowl by adding different vegetables like carrots or cucumbers, or trying various sauces beyond Tonkatsu sauce.
Are these bowls healthy?
While they are comfort food, you can make them healthier by using less oil or opting for baked katsu instead of fried.
Final Thoughts
Japanese Katsu Bowls are not only delicious but also versatile. You can easily adjust ingredients based on your preferences or dietary needs. The combination of crispy katsu, seasoned rice, and fresh vegetables makes this dish appealing for any meal. Give this recipe a try and enjoy crafting your own version of this beloved Japanese classic!
Japanese Katsu Bowls
- Total Time: 45 minutes
- Yield: Serves 4
Description
Indulge in the delightful experience of homemade Japanese Katsu Bowls, featuring perfectly crispy chicken or pork served over fluffy seasoned rice. This comforting dish is a culinary gem that brings together the rich flavors of Japan in a simple, accessible way. With its golden-brown katsu, tangy tonkatsu sauce, and fresh vegetables like shredded cabbage and green onions, this meal is sure to impress friends and family at any gathering.
Ingredients
- 2 boneless chicken breasts (or pork loin)
- 1 cup panko breadcrumbs
- 2 cups Japanese short-grain rice
- ¼ cup tonkatsu sauce
- 1 cup shredded cabbage
- Vegetable oil for frying
Instructions
- Rinse and soak the rice for 30 minutes.
- Cook the rice in a saucepan until fluffy, then season with vinegar, sugar, and salt.
- Pound chicken to an even thickness and season.
- Set up a breading station with flour, eggs, and panko.
- Bread the chicken by dredging in flour, dipping in eggs, then coating with panko.
- Fry in hot oil until golden brown; drain on paper towels.
- Assemble bowls with rice as the base, topped with sliced katsu, cabbage, green onions, and drizzle with tonkatsu sauce.
- Prep Time: 20 minutes
- Cook Time: 25 minutes
- Category: Dinner
- Method: Frying
- Cuisine: Japanese
Nutrition
- Serving Size: 1 bowl (approximately 400g)
- Calories: 650
- Sugar: 6g
- Sodium: 800mg
- Fat: 30g
- Saturated Fat: 5g
- Unsaturated Fat: 20g
- Trans Fat: 0g
- Carbohydrates: 70g
- Fiber: 3g
- Protein: 30g
- Cholesterol: 100mg


Leave a Comment