

Grilled Chickpea Veggie Pita is a delightful dish that combines flavor and nutrition in every bite. These pitas are filled with a za’atar spiced chickpea mixture, making them perfect for lunch or a light dinner. Grilling the pitas gives them a crispy exterior while keeping the inside soft and tasty. Whether you’re hosting a gathering or looking for a quick meal option, these veggie pitas will impress everyone at the table.
Why You’ll Love This Recipe
- High in Protein: Each serving of Grilled Chickpea Veggie Pita is packed with protein from chickpeas, making it a filling meal.
- Easy to Prepare: With simple ingredients and straightforward steps, this recipe can be on your table in just 40 minutes.
- Flavorful and Satisfying: The za’atar spice blend adds depth and richness, ensuring every bite is bursting with flavor.
- Versatile Meal Option: Enjoy these pitas as a main dish, or serve them alongside salads or roasted vegetables for a complete meal.
- Vegan-Friendly: This recipe caters to plant-based diets without compromising on taste or satisfaction.
Tools and Preparation
To make your Grilled Chickpea Veggie Pita, you’ll need some essential tools to streamline the cooking process.
Essential Tools and Equipment
- Cast iron skillet or griddle
- Mixing bowls
- Fork
- Knife
- Cutting board
- Whisk
Importance of Each Tool
- Cast iron skillet or griddle: Provides an even heat source for grilling your pitas perfectly.
- Mixing bowls: Essential for combining ingredients easily without mess.
- Fork: Useful for mashing chickpeas to achieve the right texture for filling.
- Knife: Necessary for chopping onions, peppers, mushrooms, and herbs uniformly.
Ingredients
Grilled Chickpea Veggie Pitas – za’atar spiced chickpea filling, stuffed into whole grain pitas then grilled until the outside is crispy. High protein, high fiber, and highly nutritious meal that will keep you satisfied.
For the Filling:
- 2 tbsp avocado oil, divided
- 1, 15 oz can chickpeas, rinsed and drained
- 1/2 yellow onion, finely diced
- 1 red bell pepper, finely diced
- 4 oz of mushrooms, finely diced
- 5 cloves garlic, minced or crushed
- 1 tbsp tomato paste
- 1/2 tbsp soy sauce or coconut aminos
- 2 tsp za’atar
- 1/2 tsp ground cumin
- 1/2 tsp ground coriander
- 1/4 tsp fennel seeds
- 1/4 cup parsley, minced
- Salt and pepper to taste
For the Pitas:
- 3 whole grain pitas
For the Yogurt Sauce:
- 1/2 cup plain, unsweetened vegan Greek-style yogurt or your favorite thick vegan yogurt
- Juice of half a lemon
- Salt and pepper to taste
- 1 clove garlic, crushed or finely grated
- 1/4 cup cilantro, finely minced
- 2 tsp extra virgin olive oil, optional
How to Make Grilled Chickpea Veggie Pita
Step 1: Prepare Chickpeas
Place your chickpeas in a bowl and roughly mash them with a fork to crumble them. Set aside.
Step 2: Sauté Vegetables
To a sauté pan over medium heat, heat up a tablespoon of oil. Add in the onion, bell pepper, and mushrooms. Give the mixture a quick toss and let it sit for 2-3 minutes to release some moisture. Add a pinch of salt and continue sautéing until most of the liquid has cooked off.
Step 3: Flavor It Up
Add the garlic and sauté until fragrant. Then add the tomato paste, mashed chickpeas, soy sauce, za’atar, cumin, coriander, and fennel seeds. Sauté for an additional 2-3 minutes.
Step 4: Mix in Fresh Herbs
Stir in the parsley. Taste your mixture and adjust seasoning according to your liking before setting it aside.
Step 5: Stuff Your Pitas
Preheat your griddle. Cut each pita in half and carefully open each pocket. Stuff each pita half until filled to the top. Brush or spray with remaining oil.
Step 6: Grill Your Pitas
Place each pita filling side down on the grill for 3-4 minutes until grill marks appear. Flip each pita and sear it for about 3 minutes on all remaining sides. Repeat this step with all remaining pitas.
Step 7: Make Yogurt Sauce
In a bowl, whisk together yogurt sauce ingredients until fully combined. Add salt and pepper to taste. Serve your grilled pita with this sauce along with any fresh veggies you like!
How to Serve Grilled Chickpea Veggie Pita
Grilled Chickpea Veggie Pitas are versatile and can be served in various delightful ways. Here are some creative serving suggestions that will enhance your dining experience.
With Fresh Veggies
- Crisp Lettuce – Add a bed of fresh greens like romaine or spinach for extra crunch.
- Sliced Cucumbers – Cool, crunchy cucumbers complement the spiced chickpea filling perfectly.
- Tomato Wedges – Juicy tomatoes add brightness and moisture to each bite.
With Dipping Sauces
- Tahini Sauce – Drizzle tahini over your pitas for a nutty flavor that pairs well with chickpeas.
- Hummus – Serve a side of hummus for added creaminess and flavor.
- Spicy Harissa – For those who enjoy heat, harissa offers a bold kick that elevates the dish.
As a Platter
- Mediterranean Salad – Create a colorful platter with olives, feta, and roasted vegetables to accompany your pitas.
- Pita Chips – Serve with crispy pita chips for an enjoyable texture contrast.

How to Perfect Grilled Chickpea Veggie Pita
To achieve the best Grilled Chickpea Veggie Pita, follow these helpful tips that guarantee delicious results.
- Bold seasoning – Season generously with za’atar and spices to enhance flavor complexity.
- Properly mash chickpeas – Crumble them just enough to maintain texture; avoid pureeing.
- Control grill temperature – Ensure the grill is hot before placing pitas on it for optimal char and crispiness.
- Use fresh herbs – Incorporate freshly minced parsley and cilantro for vibrant color and taste.
- Don’t overstuff – Fill your pitas moderately; this prevents tearing during grilling.
- Rest before serving – Allow grilled pitas to cool slightly before serving; this helps settle flavors.
Best Side Dishes for Grilled Chickpea Veggie Pita
Pairing side dishes with your Grilled Chickpea Veggie Pita can elevate the meal. Here are some excellent options to consider:
- Tabbouleh – A refreshing salad made with bulgur, parsley, tomatoes, and lemon juice; it adds brightness.
- Roasted Vegetables – Seasonal vegetables roasted with olive oil bring sweetness and depth to your meal.
- Couscous Salad – Fluffy couscous mixed with veggies and herbs provides a hearty complement.
- Grilled Asparagus – Lightly charred asparagus spears add an elegant touch to your plate.
- Fattoush Salad – A tangy salad featuring crispy pita chips, tomatoes, cucumber, and sumac dressing enhances flavors beautifully.
- Stuffed Grape Leaves (Dolmas) – These savory bites filled with rice and herbs make a great finger food alongside your meal.
Common Mistakes to Avoid
Making Grilled Chickpea Veggie Pitas can be an enjoyable experience, but it’s easy to make mistakes. Here are some common pitfalls to watch out for:
- Ignoring the chickpeas: Not mashing the chickpeas enough can lead to a dry filling. Aim for a rough mash to combine well with the other ingredients.
- Overcooking vegetables: Cooking the onion and bell pepper too long can make them mushy. Sauté them just until they soften for the best texture.
- Skipping seasoning adjustments: Not tasting your filling before stuffing can lead to bland pitas. Always adjust seasoning after combining all ingredients.
- Neglecting pita preparation: Forgetting to brush or spray oil on the pitas can result in sticking and uneven grilling. Be sure to coat them lightly for a crispy exterior.
- Rushing the grilling process: Placing the pitas on high heat too quickly may burn them. Grill on medium heat for even cooking and nice grill marks.
Refrigerator Storage
- Store grilled pitas in an airtight container.
- They will last for 3-4 days in the fridge.
Freezing Grilled Chickpea Veggie Pita
- Wrap individual pitas tightly in plastic wrap or foil.
- Place them in a freezer-safe bag or container.
- They can be frozen for up to 2 months.
Reheating Grilled Chickpea Veggie Pita
- Oven: Preheat your oven to 350°F (175°C). Place pitas on a baking sheet and heat for about 10 minutes.
- Microwave: Wrap each pita in a damp paper towel and microwave for 30-60 seconds until warm.
- Stovetop: Heat a non-stick skillet over medium heat. Warm each pita for about 2-3 minutes on each side.
Frequently Asked Questions
What is a Grilled Chickpea Veggie Pita?
A Grilled Chickpea Veggie Pita is a delicious stuffed pita filled with za’atar spiced chickpeas and vegetables, grilled until crispy.
Can I customize my Grilled Chickpea Veggie Pita?
Yes! You can add your favorite veggies, swap spices, or use different types of yogurt sauces for variety.
How do I ensure my Grilled Chickpea Veggie Pita doesn’t get soggy?
Make sure to cook off excess moisture from vegetables and avoid overstuffing your pita.
What dips go well with Grilled Chickpea Veggie Pita?
This pita pairs wonderfully with tahini sauce, hummus, or any yogurt-based dip you like!
Final Thoughts
Grilled Chickpea Veggie Pitas are not only nutritious but also versatile. You can tailor them with various fillings and sauces to match your taste. Enjoy this meal as a satisfying lunch or dinner option that everyone will love!
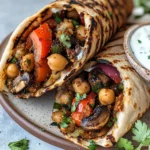
Grilled Chickpea Veggie Pita
- Total Time: 40 minutes
- Yield: Serves 3
Description
Grilled Chickpea Veggie Pita is a delicious, protein-packed dish that brings together the vibrant flavors of za’atar-spiced chickpeas and fresh vegetables, all wrapped in crispy whole grain pitas. Perfect for lunch or a light dinner, this meal is not only quick to prepare but also customizable to suit your taste preferences. With its satisfying texture and rich flavors, it’s sure to impress both vegans and non-vegans alike. Serve them alongside your favorite dipping sauces or fresh salads for a complete dining experience.
Ingredients
- 1 can chickpeas
- 1/2 yellow onion
- 1 red bell pepper
- 4 oz mushrooms
- 5 cloves garlic
- Za’atar spice blend
- Whole grain pitas
- Vegan Greek-style yogurt (for sauce)
Instructions
- Mash chickpeas in a bowl until slightly crumbled.
- Sauté diced onions, bell peppers, and mushrooms in oil until softened.
- Add minced garlic, mashed chickpeas, tomato paste, soy sauce, and spices; cook until well blended.
- Stir in fresh parsley and adjust seasoning.
- Stuff pita halves with the chickpea mixture and brush with oil.
- Grill on medium heat for about 3-4 minutes on each side until golden brown.
- For the yogurt sauce, mix yogurt with lemon juice, minced garlic, cilantro, salt, and pepper.
- Prep Time: 15 minutes
- Cook Time: 25 minutes
- Category: Main
- Method: Grilling
- Cuisine: Mediterranean
Nutrition
- Serving Size: 1 filled pita (120g)
- Calories: 295
- Sugar: 3g
- Sodium: 350mg
- Fat: 10g
- Saturated Fat: 1g
- Unsaturated Fat: 8g
- Trans Fat: 0g
- Carbohydrates: 43g
- Fiber: 10g
- Protein: 12g
- Cholesterol: 0mg

Leave a Comment